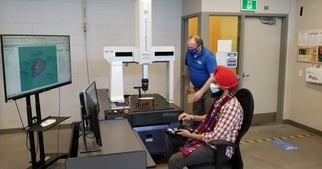
Research & Innovation’s leading-edge dimensional metrology equipment has received a performance upgrade thanks to a partnership with a global inspection analysis software leader.
Origin International Inc. (OII) and Walker Advanced Manufacturing Innovation Centre (WAMIC) are collaborating to bring additional capabilities to the Centre’s research and technical services repertoire.
Ontario-based Origin is the world leader in SOLIDWORKS-based touch probe and laser digitizer inspection programming and analysis software. Origin’s CheckMate software is an add-in for SOLIDWORKS, the leading CAD software in the manufacturing supply chain. CheckMate provides extensive functionality for coordinate measuring machine (CMM) programming applications.
Origin will work with the WAMIC research team to support inspection programming and analysis.
The new Origin software supports both WAMIC’s recently-acquired Mitutoyo/Renishaw CMM and the research laboratory’s FARO ScanArm laser digitizer.
“Working with Origin will enable us to develop a wide range of state-of-the-art design and manufacturing solutions,” notes WAMIC research lead Allan Spence, PhD.
“The pace of manufacturing is picking up worldwide and it’s vital for Ontario manufacturers to keep up. It’s a technology challenge and a skills challenge,” says Origin global business development director Geoff Foulds.
“Origin’s collaboration with WAMIC will help deliver the insights and services southern Ontario manufacturers need,” says Foulds, adding the collaboration will also provide Origin with the ready lab access it needs to keep its solutions on the cutting edge.
“Origin’s collaboration with WAMIC will help deliver the insights and services southern Ontario manufacturers need.”
~ Geoff Foulds, Origin global business development director
In July 2020, the new CMM was installed in the Welland campus labs at Niagara College. The CMM is considered the most precise measuring technology on the spectrum.
It is the “gold standard, to which other instruments can be calibrated against, and will provide enhanced confidence to industry partners that our measurement services meet expectations,” says Spence.
The advanced precision measurement instrument, along with the new CheckMate software is good news for advanced manufacturing companies requiring high-accuracy micrometre-scale dimensional metrology.
Factories, for example, with worn or broken rotating machinery parts require measurements, but often the components can be decades old, with no CAD drawings available, notes Spence, whose background is in the science of measurement, and has an established reputation in Geometric Dimensioning and Tolerancing (GD&T).
The CMM – acquired thanks to funding from the Natural Sciences and Engineering Research Council of Canada (NSERC) through its Applied Research Tools and Instruments (ARTI) grants program – has added to WAMIC’s current leading-edge dimensional metrology equipment, such as its laser triangulation and distance technology, including the FARO Focus, FARO Tracker and FARO Scan Arm.
To learn more about the Walker Advanced Manufacturing Innovation Centre, its resources, capabilities and the types of research projects we undertake, visit the website.
